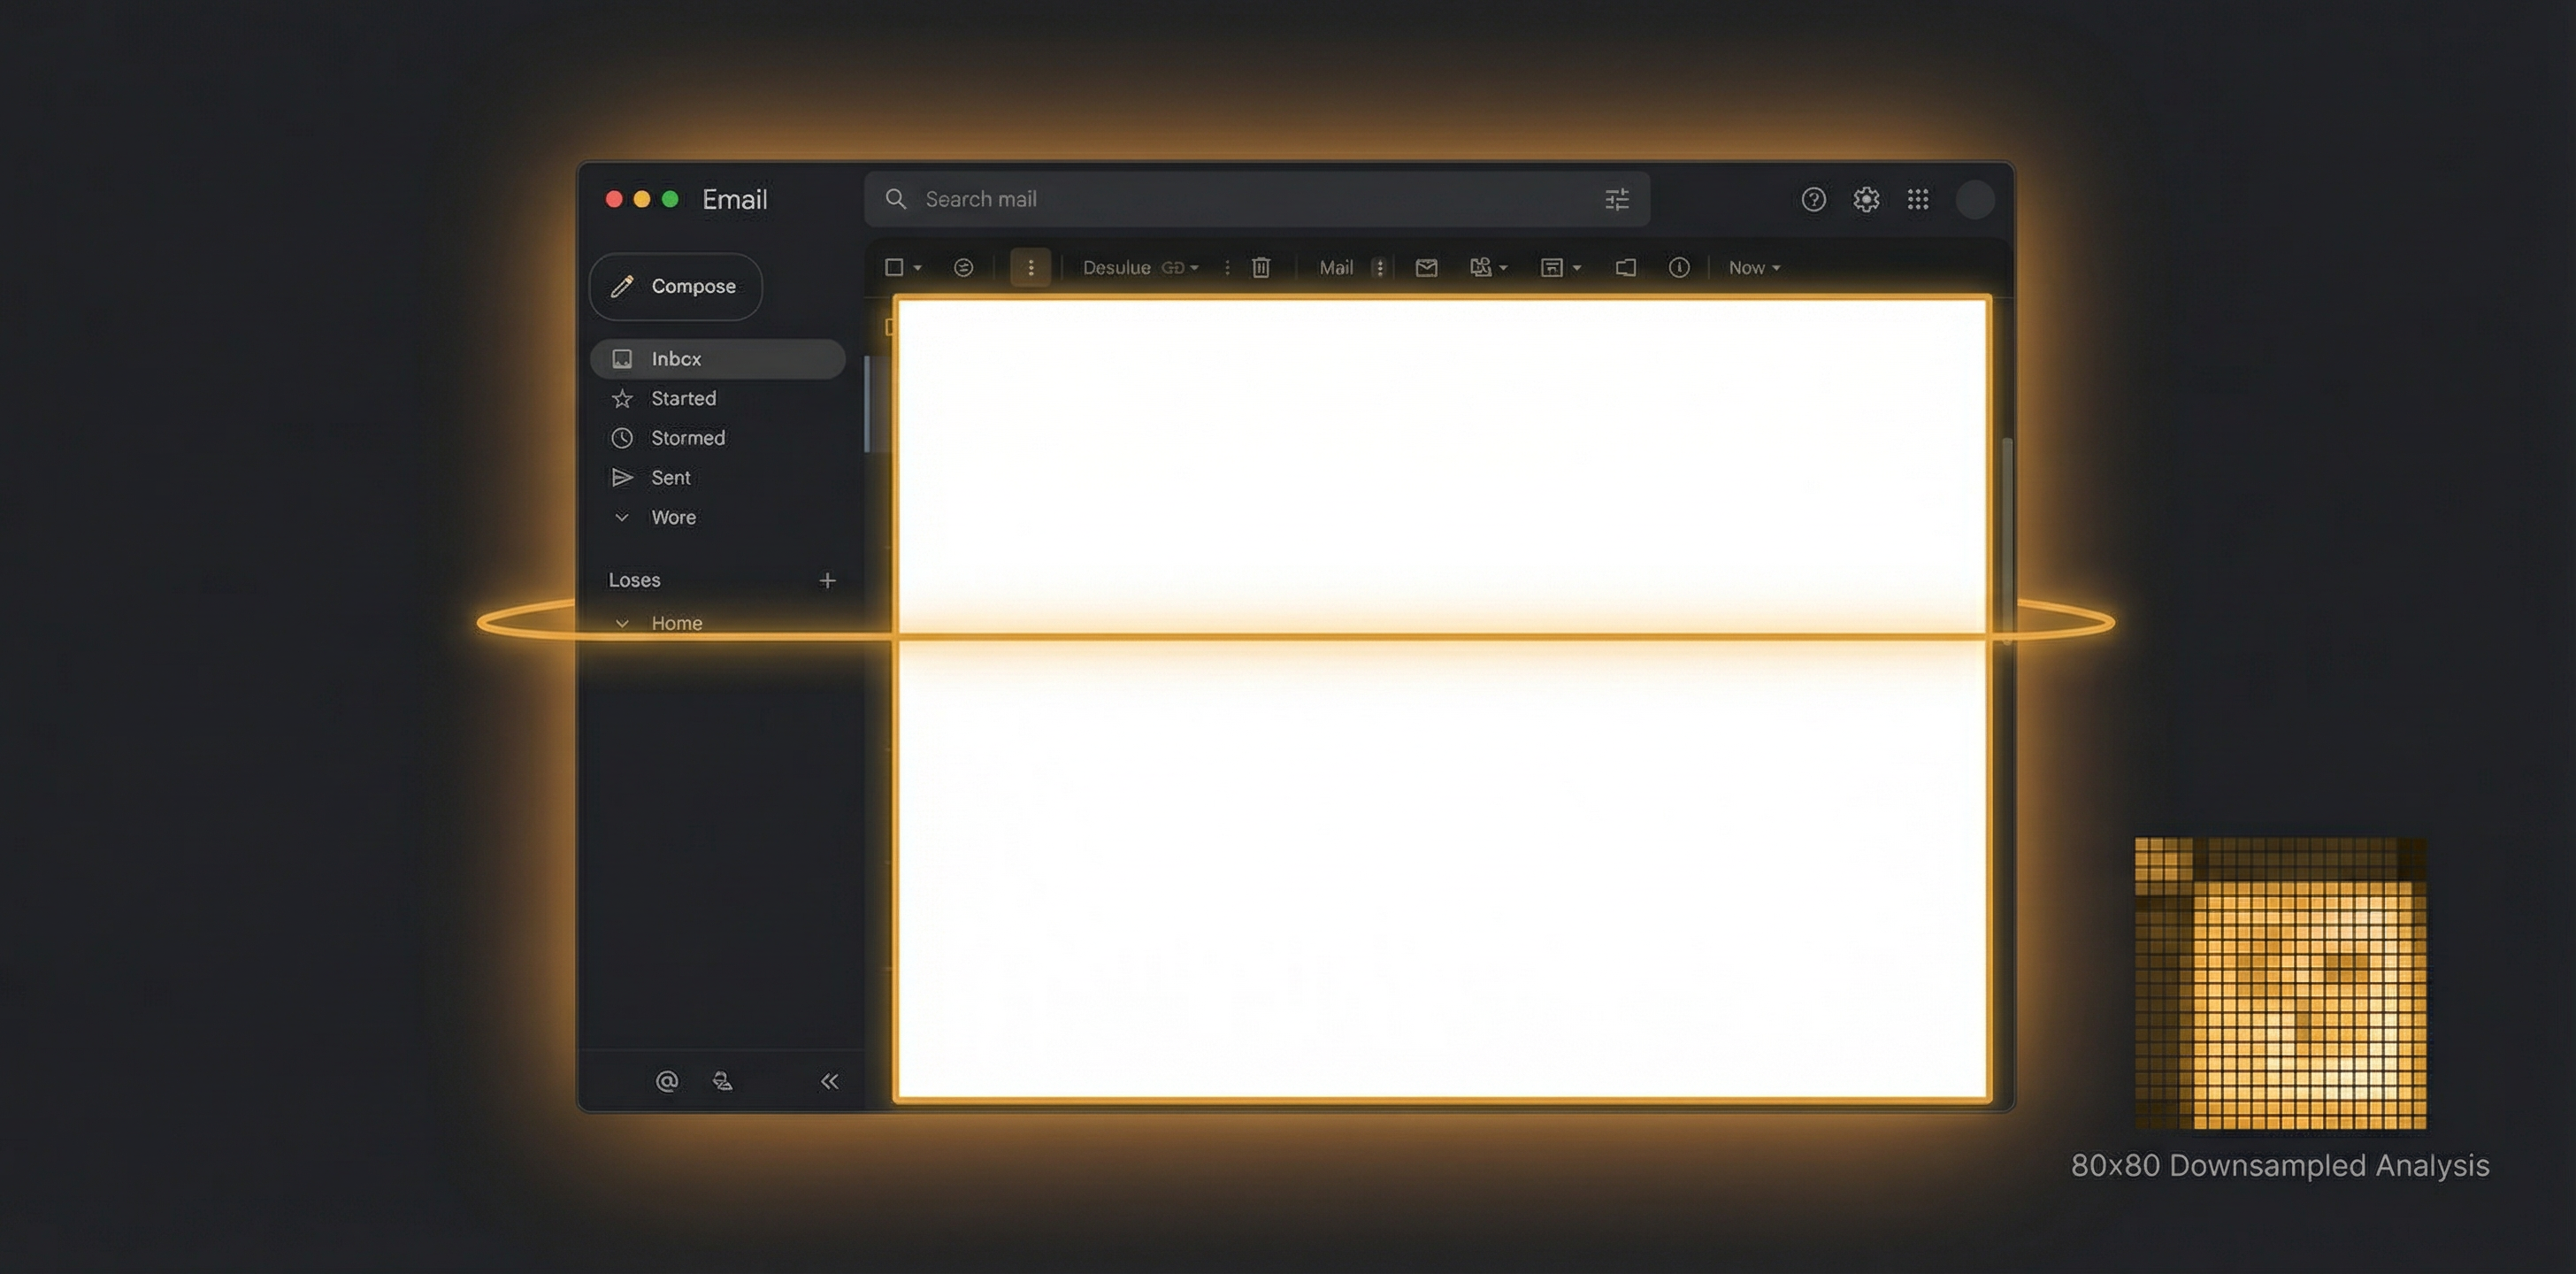
Most screen dimming software operates at the window level — it either dims an entire window or it doesn't. But what about a dark-themed email app displaying a white HTML email? Or a code editor with a bright preview pane? The window is dark, but parts of it are blindingly bright. This is the problem that zone dimming solves, and here's how we built it.
The Problem: Dark Windows with Bright Content
Modern apps increasingly support dark mode, which means their chrome (toolbars, sidebars, status bars) is dark. But the content they display often isn't. Consider these common scenarios:
- Mail.app in dark mode showing a white HTML newsletter — the email body is essentially a 600px-wide white rectangle
- VS Code with a dark theme but a Markdown preview pane showing rendered white-background HTML
- Safari in dark mode displaying any website with a white background
- Slack where individual messages might contain bright image previews or embedded content
Whole-window dimming doesn't work here. If you dim the entire Mail window to tame the bright email, you also dim the already-dark sidebar and toolbar, making them unreadable. You need selective dimming — dim just the bright region, leave the dark parts alone.
Our Approach: Connected Component Analysis
SuperDimmer's zone dimming uses a computer vision technique called connected component analysis to find bright regions within windows. Here's the pipeline:
Step 1: Screen Capture
We use ScreenCaptureService to grab a CGImage of each visible window's contents. macOS's CGWindowListCreateImage API lets us capture individual window contents without capturing overlapping windows. This gives us a clean per-window image to analyze.
Step 2: Downsampling
Analyzing a full-resolution window image (say, 2560x1440 pixels on a Retina display) would be prohibitively expensive for real-time analysis. We downsample each window image to 80x80 pixels. This 1000x reduction in pixel count makes the analysis nearly instant while still preserving the spatial layout of bright and dark regions.
Why 80x80? Through testing, we found this resolution is enough to distinguish between regions as small as ~3% of the window area (about the size of a notification popup or a small embedded image) while keeping analysis under 1ms.
Step 3: Luminance Masking
Each pixel in the downsampled image is converted to a brightness value using the standard luminance formula:
// Human eyes are most sensitive to green,
// then red, then blue
luminance = 0.299 * R + 0.587 * G + 0.114 * B
Pixels above the user's configured brightness threshold are marked as "bright" (1), and those below are "dark" (0). This creates a binary mask — an 80x80 grid of ones and zeros where ones represent bright pixels.
Step 4: Flood Fill (Connected Components)
The binary mask often has many isolated bright pixels scattered around. We need to group adjacent bright pixels into coherent regions. We use a classic flood fill algorithm — starting from each unvisited bright pixel, we recursively mark all connected bright neighbors as part of the same component.
This is the same algorithm used in the "paint bucket" tool in image editors, and it's remarkably effective at finding contiguous bright areas.
Step 5: Bounding Box Computation
For each connected component, we compute the bounding rectangle — the smallest axis-aligned rectangle that contains all pixels in the component. These bounding boxes become our dimming regions.
Step 6: Merge and Filter
The raw bounding boxes often include many small regions (individual bright UI elements, icons, etc.) that would create visual noise if each got its own overlay. We apply two post-processing steps:
- Merging: Regions within ~15% of the window size of each other are merged into a single larger region. This combines, for example, a bright email body with a nearby bright attachment preview into one dimming overlay.
- Filtering: Regions smaller than 100px or larger than 2000px in any dimension are discarded. Too-small regions would be invisible or distracting. Too-large regions effectively cover the whole window (at which point whole-window dimming is more appropriate).
Step 7: Coordinate Mapping
The bounding boxes are in downsampled image coordinates (0-80). We normalize them to 0.0-1.0 ratios, then map to screen coordinates by multiplying by the actual window dimensions. There's also a Y-axis flip because CGImage coordinates have origin at top-left while Cocoa (AppKit) coordinates have origin at bottom-left.
The entire pipeline — capture, downsample, luminance mask, flood fill, bounding boxes, merge, filter, and coordinate mapping — completes in under 15ms per window. We run this every 2 seconds (configurable as scanInterval), and results are cached per window with invalidation on bounds change or focus change.
Overlay Management: The Hard Part
Detecting bright regions is only half the challenge. The other half is managing the transparent overlay windows that actually perform the dimming. This turned out to be far more complex than the detection algorithm.
Window-Keyed Overlay Mapping
An early version of zone dimming used a global list of overlay windows — "overlay 1", "overlay 2", etc. This caused a maddening bug: overlays would "jump" between windows. When a bright region in Window A disappeared and a new one appeared in Window B, the same overlay would slide from A to B instead of fading out and in.
The fix was to key overlays by target window ID. Each window gets its own set of region overlays. When the bright regions within a window change, only that window's overlays are updated. Other windows' overlays are untouched.
Position Tracking During Window Movement
When the user drags a window, its region overlays need to move with it. We track previousWindowBounds and compute a delta each update cycle:
let deltaX = currentBounds.x - previousBounds.x
let deltaY = currentBounds.y - previousBounds.y
for overlay in windowOverlays {
overlay.frame.origin.x += deltaX
overlay.frame.origin.y += deltaY
}
When we detect movement in 2 or more consecutive cycles, we switch to high-frequency tracking (~30 fps) to keep overlays smooth during active window dragging.
Caching for Performance
Running pixel analysis on every window every 2 seconds is manageable, but unnecessary when windows haven't changed. We cache analysis results per window and invalidate the cache when:
- The window's bounds change (it was moved or resized)
- The window's frontmost status changes (focus changed)
- The cache expires (after ~10 seconds, to catch content changes like scrolling)
Real-World Results
Zone dimming transforms the experience of using dark-themed apps with bright content:
- Mail.app: The bright HTML email gets dimmed while the dark sidebar remains crisp and readable
- Safari: White-background websites get a comfortable dimming while the dark browser chrome stays untouched
- Code editors: Bright preview panes are dimmed independently from the dark code editor
- Any app: Bright pop-ups, embedded content, or white-background regions get targeted dimming
The effect is subtle but powerful — your screen feels uniformly comfortable rather than having jarring bright spots punching through an otherwise dark setup.
Try Zone Dimming
SuperDimmer's zone dimming works automatically — detect and dim only the bright regions within any window. Free during early access.
Download Free for macOS