macOS Spaces — Apple's virtual desktop feature — is one of the most powerful productivity tools hiding in plain sight on your Mac. Yet most people either don't use Spaces at all, or use them inefficiently with the trackpad gesture.
The secret to making Spaces truly useful? Keyboard shortcuts. When you can jump to any Space instantly with a keypress, your entire approach to workspace organization changes. Here's how to set it up and supercharge it.
What Are macOS Spaces?
Spaces are virtual desktops on macOS. Each Space is a separate workspace with its own arrangement of windows and apps. You can have up to 16 Spaces per display. The idea is simple: instead of layering all your windows on one screen, spread them across multiple Spaces organized by task or context.
For example:
- Space 1: Communication — Mail, Slack, Messages
- Space 2: Primary work — Code editor, terminal, documentation
- Space 3: Research — Safari with reference tabs
- Space 4: Design — Figma, image editors
- Space 5: Admin — Calendar, spreadsheets, project management
Setting Up Built-In Keyboard Shortcuts
macOS supports keyboard shortcuts to switch directly to specific Spaces, but they're not enabled by default. Here's how to set them up:
- Open System Settings (or System Preferences on older macOS)
- Go to Keyboard > Keyboard Shortcuts > Mission Control
- You'll see options like "Switch to Desktop 1", "Switch to Desktop 2", etc.
- Enable each one and assign a shortcut. The traditional choice is Ctrl + 1 through Ctrl + 9
macOS only shows shortcut options for Spaces that already exist. If you only have 2 Spaces, you'll only see options for Desktop 1 and Desktop 2. Create additional Spaces first via Mission Control (swipe up with three fingers, then click "+" in the top right), then return to set up the shortcuts.
Limitations of the Built-In Approach
While the native shortcut system works, it has significant limitations:
- No visual feedback: When you switch Spaces, you see the swipe animation, but there's no indicator of which Space you're on or how many exist.
- No Space labels or notes: All Spaces look the same — just "Desktop 1", "Desktop 2". You have to remember what's on each one.
- Ctrl shortcuts conflict: Ctrl + number combinations conflict with many apps (terminal, IDE keyboard shortcuts).
- No overview: You can't see all Spaces at once without entering Mission Control, which interrupts your flow.
Super Spaces HUD: Keyboard Shortcuts Done Right
This is where SuperDimmer's Super Spaces HUD comes in. It's a floating workspace manager built into SuperDimmer that reimagines how you interact with macOS Spaces.
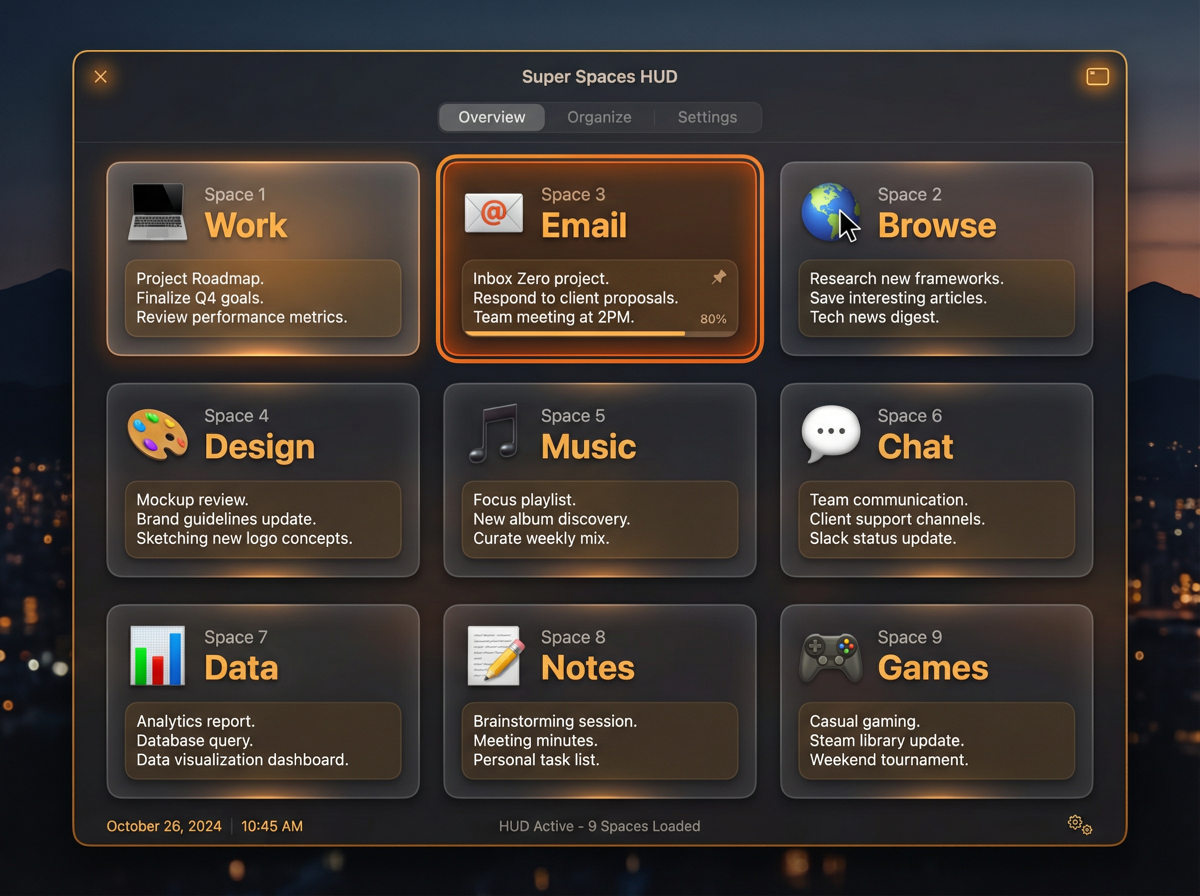
Super Spaces HUD overview mode — see all your Spaces at a glance with notes.
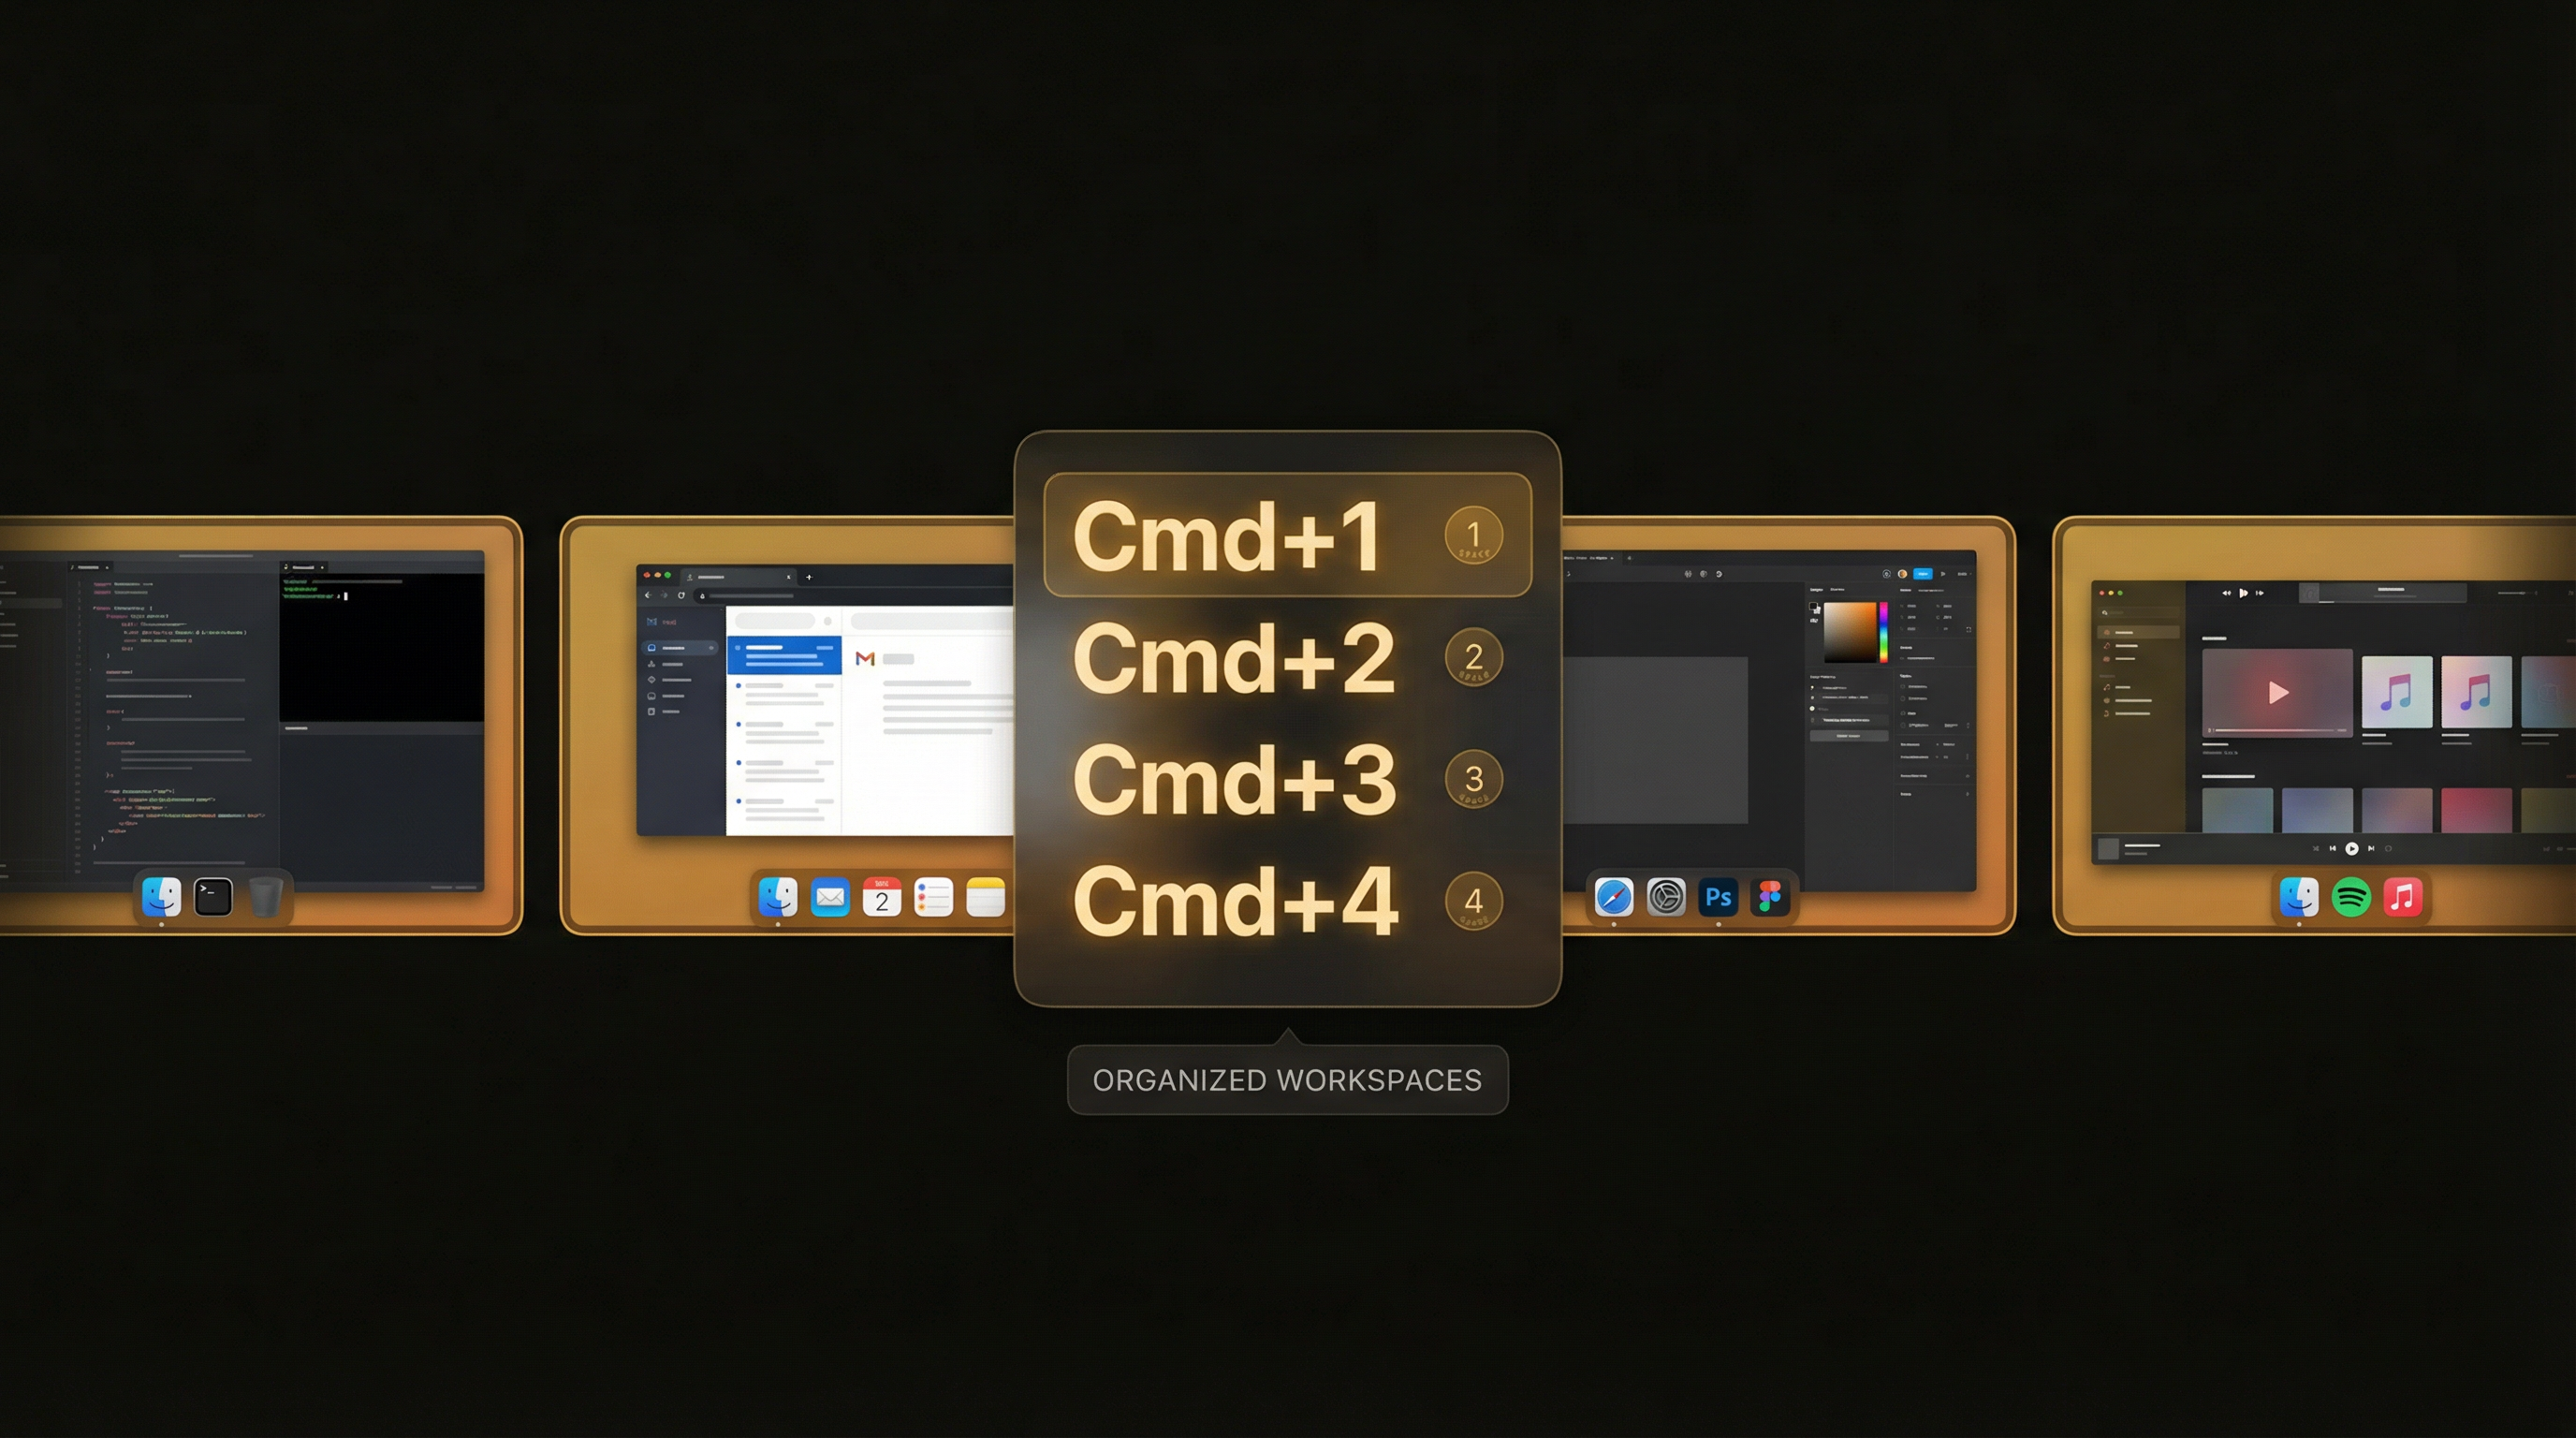
Instant Switching with Cmd+1-9
Super Spaces HUD uses Cmd + 1 through Cmd + 9 for Space switching. Why Cmd instead of Ctrl? Two reasons:
- Less conflict: Cmd+number is less commonly used by apps than Ctrl+number
- Muscle memory: Cmd+number already maps to "switch to tab N" in browsers and many apps. Extending this to "switch to Space N" feels natural.
The switch is instant — no animation delay, no swipe, no Mission Control. Press Cmd + 3 and you're on Space 3.
Per-Space Notes
One of the biggest problems with Spaces is remembering what's where. Super Spaces HUD lets you add persistent notes to each Space. Open the HUD, and you see your notes right there — "Working on blog post", "Client call at 3pm", "Design review files".
Notes persist across app restarts and system reboots. They're stored locally with no cloud sync needed.
Visual Overview Mode
Instead of entering Mission Control, Super Spaces HUD offers a visual overview grid that shows all your Spaces at once. You can see which Space you're on, what notes are attached, and switch by clicking. It also shows visual indicators for visit order and recent activity.

Compact mode for quick Space switching.
Pro Tips for Organizing Your Spaces
Once you have fast keyboard switching, here are strategies to maximize your Spaces setup:
1. Context-Based Organization
Group windows by task context, not by app. Instead of "all Safari windows on Space 3", try "all windows related to Project X on Space 3". This means your browser tabs, code editor, and terminal for that project all live together.
2. Keep Space 1 as Your Hub
Make Space 1 your "home base" — communication apps, calendar, and anything you check frequently. Since Cmd + 1 is the easiest shortcut, it should be the Space you visit most.
3. Use Progressive Dimming
SuperDimmer's progressive dimming feature dims windows based on how recently you used them. Combined with Spaces, this means when you switch to a Space, the windows you used most recently on that Space are brightest, giving you instant visual context of where you left off.
4. Don't Overdo It
More Spaces isn't always better. Most productive setups use 3-5 Spaces. Beyond that, you start losing track of what's where. The notes feature helps, but cognitive load increases with each additional Space.
5. Assign Apps to Spaces
Right-click any app in the Dock > Options > Assign To. You can assign apps to specific Spaces so they always open where you expect them. Combine this with Space notes ("Space 2: Dev — VS Code, Terminal, Docs") for a self-documenting setup.
Other Useful macOS Keyboard Shortcuts for Spaces
Beyond Space switching, here are related shortcuts worth memorizing:
- Ctrl + ← / → — Move to adjacent Space
- Ctrl + ↑ — Open Mission Control
- F11 — Show Desktop
- Ctrl + ↓ — Show windows of current app (App Exposé)
With Super Spaces HUD, you get the additional Cmd + 1-9 shortcuts for direct Space access, which is the biggest gap in macOS's native toolset.
Try Super Spaces HUD
Part of SuperDimmer — keyboard shortcuts, per-Space notes, visual overview, and progressive dimming. All free during early access.
Download Free for macOS